
Using the native payment request JavaScript API

I'm a full-stack developer from South Africa 🇿🇦. I love writing about JavaScript, HTML and CSS.
The other day I was browsing some articles. In one of these articles, they described the Payment Request API. At that point, I'd never heard of it before, but it sparked my interest.
Whenever we build websites that allow people to pay for something, we enter a new level of difficulty.
(Luckily, Stripe and others have made this a little bit easier)
But how cool would it be if it was simply an API in the browser? 🤔
Our prayers seem to have been heard as we now get access to the Payment Request API.
In the video below, you see a complete experience for the end user.

What is the Payment Request API
First, it's good to note that the Payment Request API is not a new way of paying for stuff. It's instead an optimized flow for both the consumer and the merchant to have a seamless native experience when paying online.
The experience with the payment request flow is that the consumer no longer has to fill out multiple forms containing all kinds of details.
They instead leverage what is already set up in their browser. And this makes total sense, right.
Why would I need to fill out my shipping address on every website, it rarely changes, and the same goes for personal details.
So why not leverage this in the browser!
Setting up a payment
Let's see how we can use this Payment Request API in our application.
For this demo, I'll simulate a donation button where people can donate one dollar because they love the content.
A second note is that you can leverage Bobbucks when testing this out. This is an app that helps to process demo payments.
Let's create our sample button and a text box with some information for the user.
<button id="checkout">Donate 1$</button>

<div id="response">You won't be actually charged, give it a test drive 🤘</div>
We must attach a click handler to the button to start the payment process.
button.addEventListener('click', () => {
  // Do something
});
The next step is to start setting up the payment request. In its most basic form, it looks like this:
const request = new PaymentRequest(paymentMethods, paymentDetails);
The payment methods can contain a list of supported payment methods. Each item in the object consists of two parameters.
supportedMethods: URL Based string pointing to the payment endpointdata: Optional information provided by the payment provider
If we now take Bobbucks (our demo payment provider) as an example, we can initiate that with the following context.
const paymentMethods = [
  {
    supportedMethods: 'https://bobbucks.dev/pay',
  },
];
Bobbucks doesn't take any optional data.
The second part of the request is the data around what we are paying for.
Generally, this would most likely come from your shopping cart, but since we use a static 1$ donation, we can provide it hard-coded.
const paymentDetails = {
  id: 'demo-123',
  displayItems: [
    {
      label: 'Support for this blog',
      amount: { currency: 'USD', value: '1.00' },
    },
  ],
  total: {
    label: 'Total',
    amount: { currency: 'USD', value: '1.00' },
  },
};
Now that we have all the information let's put it into action and initiate the payment request when the user clicks the button.
button.addEventListener('click', () => {
  request.show().then((paymentResponse) => {
    paymentResponse.complete('success').then(() => {
      response.innerText = 'Thanks for your donation 💖';
    });
  });
});
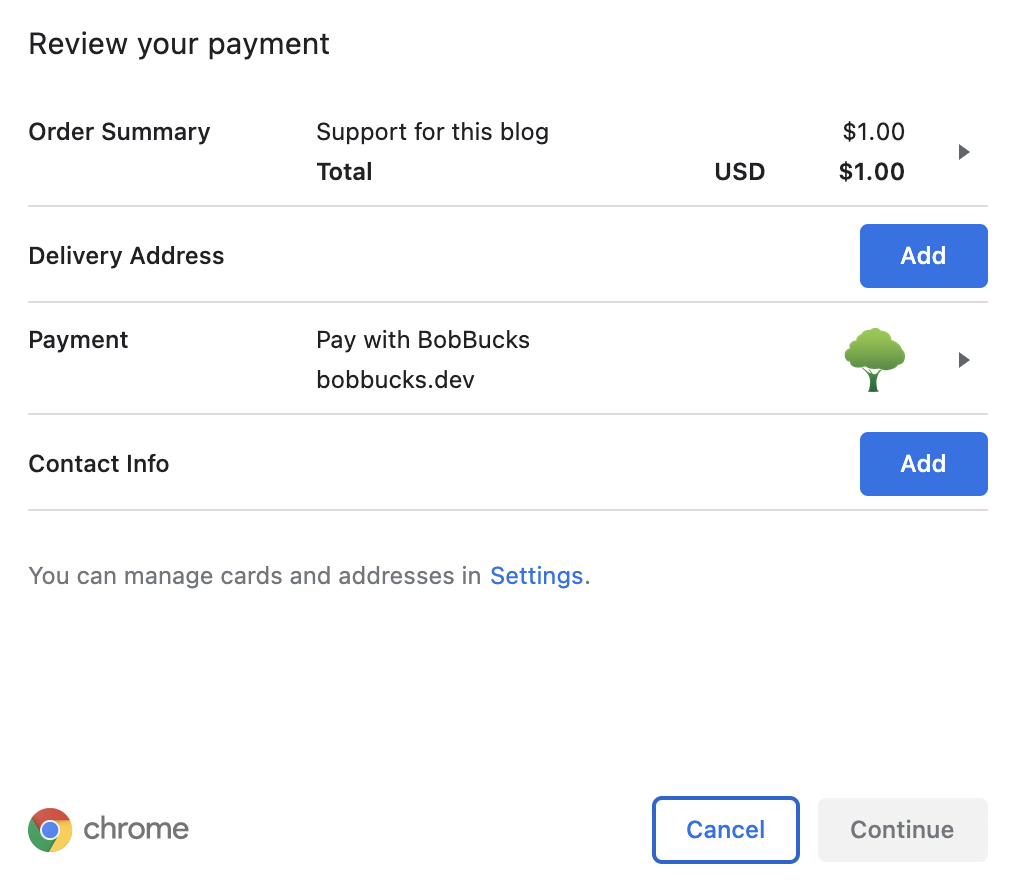
Now click the button, and you should see the magic happen 🪄.
Handling the payment
It's good to note that although this API handles all the payment magic, you still need to handle the payment on your side.
In this demo, we don't go into detail about that, but it's up to you to integrate some server-side validation of whether the payment was successful and what data you need to process based on the response.
To showcase a response, it's available as the return object from the show method.
button.addEventListener('click', () => {
  request.show().then((paymentResponse) => {
    console.log(paymentResponse);
    // Handle payment before showing the success!
    paymentResponse.complete('success').then(() => {
      response.innerText = 'Thanks for your donation 💖';
    });
  });
});
This response object will look something like this.
details: {bobbucks_token_id: 'ABCDEADBEEF', message: 'Thanks for using BobBucks!'}
methodName: "https://bobbucks.dev/pay"
onpayerdetailchange: null
payerEmail: null
payerName: null
payerPhone: null
requestId: "demo-123"
shippingAddress: null
shippingOption: null
Multiple payment methods
So far, we have played around with Bobbucks since it's a super easy way to test this API.
But what happens if we enter a real-world scenario, we often want to give the user multiple payment provider options.
Let's take Google Pay, for instance. Luckily for us, Google Pay also has a demo mode that we can use to test it out.
As mentioned in the beginning, the payment methods can accept multiple providers.
Let's add Google Pay to it.
const paymentMethods = [
  {
    supportedMethods: 'https://bobbucks.dev/pay',
  },
  {
    supportedMethods: 'https://google.com/pay',
  },
];
Remember I told you about the different data objects we can provide? Well, Google Pay is one of those providing us with this object.
You can find the entire object on the Google documentation website.
But in general, it would look something like this.
const paymentMethods = [
  {
    supportedMethods: 'https://bobbucks.dev/pay',
  },
  {
    supportedMethods: 'https://google.com/pay',
    data: {
      environment: 'TEST',
      apiVersion: 2,
      apiVersionMinor: 0,
      merchantInfo: {
        // merchantId: '12345678901234567890',
        merchantName: 'Example Merchant',
      },
      allowedPaymentMethods: [
        {
          type: 'CARD',
          parameters: {
            allowedAuthMethods: ['PAN_ONLY', 'CRYPTOGRAM_3DS'],
            allowedCardNetworks: [
              'AMEX',
              'DISCOVER',
              'INTERAC',
              'JCB',
              'MASTERCARD',
              'MIR',
              'VISA',
            ],
          },
          tokenizationSpecification: {
            type: 'PAYMENT_GATEWAY',
            parameters: {
              gateway: 'example',
              gatewayMerchantId: 'exampleGatewayMerchantId',
            },
          },
        },
      ],
    },
  },
];
Quite a chunk of data, I won't be going into details, but it tells Google Pay which methods you accept and how you want the payment to be handled.
Now, if we re-open our payment, we should get an intermediate step where we get the option to choose which payment provider we want to use.

Require payment options
So far, we only require people to pay. We don't care about any details.
But what happens if we have a product that needs shipping? Or do we want to know the user's email address so we can send them our e-book?
Well, that's where we can use the payment options for.
This is where we can set the third option on the payment request constructor.
const paymentOptions = {
  requestPayerName: true,
  requestPayerEmail: true,
  requestPayerPhone: true,
  requestShipping: true,
  shippingType: 'shipping',
};

const request = new PaymentRequest(
  paymentMethods,
  paymentDetails,
  paymentOptions
);
Now when we click the payment button, we see some extra options we have to fill out before we can continue.
Demo
I'm sure this is the part most of you were waiting for, a demo to try it out yourself.
Feel free to test this CodePen. (You won't be charged, and you can use Bobbucks to simulate a payment)
Thank you for reading, and let's connect!
Thank you for reading my blog. Feel free to subscribe to my email newsletter and connect on Facebook or Twitter



