
Protecting our Laravel API with Sanctum

I'm a full-stack developer from South Africa 🇿🇦. I love writing about JavaScript, HTML and CSS.
Yesterday we learned how to create our API and routes so we can retrieve data from our application. However, the data was not secured, and anyone who wants to can retrieve it.
So in this article, I will be adding Laravel Sanctum to our application. Sanctum is a lightweight authentication system, much like Passport, but easier.
Disclaimer: This article is my first experience with Sanctum
The end result for this article is to log in as a user and only then see the protected routes.
Adding Laravel Sanctum to our project
The first step in this whole process is to add Laravel Sanctum to our project.
Let's first add Sanctum.
composer require laravel/sanctum
This will install the package and its dependencies. Next up, we need to publish the config files for Sanctum.
php artisan vendor:publish --provider="Laravel\Sanctum\SanctumServiceProvider"
Let's run our migration so the token table will be created.
php artisan migrate
The last step, for now, is to register the Sanctum middleware group inside our app/Http/Kernel.php file.
'api' => [
    \Laravel\Sanctum\Http\Middleware\EnsureFrontendRequestsAreStateful::class,
    'throttle:api',
    \Illuminate\Routing\Middleware\SubstituteBindings::class,
],
Creating a basic user
Before we go any further, we should add a basic user that we can use to login.
I decided to add a simple seeder for this in the database/seeder/DatabaseSeeder.php file.
DB::table('users')->insert([
    'name' => 'Tester',
    'email' => '[email protected]',
    'password' => bcrypt('pa$$w0rd'),
]);
Note: You can also use Tinker for this. More on that in a later article
Now just run the seeder to create our first user.
artisan migrate:fresh --seed
Creating a login route
Ok, so now we have a user and Sanctum installed, but we have no login endpoint.
Let's firstly create a new controller for this.
php artisan make:controller AuthController
Inside we will make a login function and me function.
public function login(Request $request)
{
    if (!Auth::attempt($request->only('email', 'password'))) {
        return response()->json([
            'message' => 'Invalid login details'
        ], 401);
    }

    $user = User::where('email', $request['email'])->firstOrFail();

    $token = $user->createToken('auth_token')->plainTextToken;

    return response()->json([
        'access_token' => $token,
        'token_type' => 'Bearer',
    ]);
}
The login function will check if we have the email and password field and attempt a login call.
Once that succeeds, we create a new token for this user and return it as output.
Let's also create the me function that should return the logged-in user object.
public function me(Request $request)
{
    return $request->user();
}
Next up, register these routes inside the routes/api.php file.
Route::post('login', [AuthController::class, 'login']);
Let's first test out the login call in Postman/Eclipse.
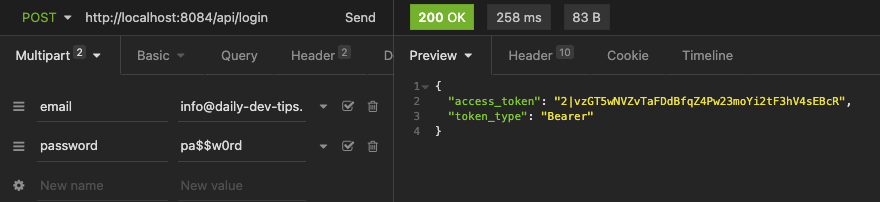
It works!
Protecting our existing routes
We will need the access_token to do any other call, but we need to protect our routes before we can do that.
Inside the routes/api.php add the following sections.
Route::middleware(['auth:sanctum'])->group(function () {
    Route::get('me', [AuthController::class, 'me']);
    Route::resource('books', BookController::class);
});
This will protect the me route and all our book routes.
Let's try it out and call the me route.
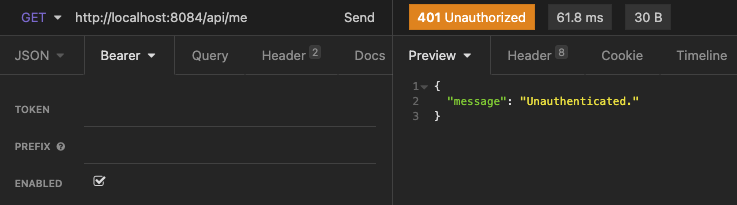
Perfect, the API returns an unauthenticated message.
You might see I opened the Bearer option, so if we now add the token we just received in the login call, it should work.
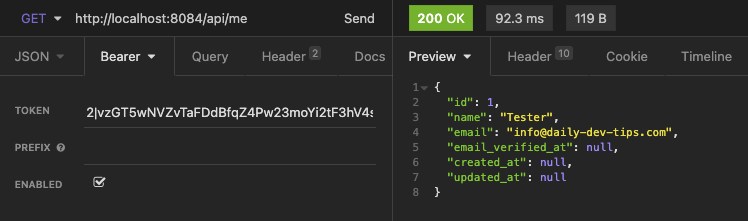
Yes, it works! And the same can be tested for the book routes, but I'll leave that to you!
Thank you for reading, and let's connect!
Thank you for reading my blog. Feel free to subscribe to my email newsletter and connect on Facebook or Twitter



