
Next.js posting data to Postgres through Prisma

I'm a full-stack developer from South Africa 🇿🇦. I love writing about JavaScript, HTML and CSS.
Hi everyone! In the past couple of articles, we have been looking at Prisma and Postgres databases.
In this article, I will create a Next.js app that can post data to a Postgres database.
What we'll be building:
- User signs in with Spotify
- User loads their playlists from Spotify
- User can sync one of the playlists to our Postgres database
It will look like this:

Setting up the starting point
I'm going to use the Spotify login example we made yesterday as the starting point for today's article.
If you want to follow along, download it from GitHub here.
The first thing we need to do is add the Prisma dependencies to our application.
npm i -D prisma
npm i @prisma/client
Then we need to initialize the Prisma client.
npx prisma init
This will generate the Prisma folder and add a database URL to our .env file.
Open up the .env file and paste your Postgres database URL.
Set up the database
The next thing we need to do is define a schema for our playlist. Open the prisma/schema.prisma file and add the following schema at the bottom.
model Playlist {
  id           Int @default(autoincrement()) @id
  title        String
  image        String?
  uri          String @unique
  addedBy      String
}
From here, we need to build our database.
npx prisma db push
As well as generate the local schema:
npx prisma generate
Creating an API endpoint to post our entity
We already have a playlists endpoint so let's leverage that one but modify it to accept POST requests.
Open the pages/api/playlists.js file and start by importing the Prisma requirements.
import { PrismaClient } from '@prisma/client';
const prisma = new PrismaClient();
Now let's modify the handler to do something on POST and GET.
const handler = async (req, res) => {
  const {
    token: { accessToken, email },
  } = await getSession({ req });
  if (req.method === 'POST') {
    // Do post stuff
  } else if (req.method === 'GET') {
    const response = await getUsersPlaylists(accessToken);
    const { items } = await response.json();
    return res.status(200).json({ items });
  }
  res.end();
};
As for the POST section, we want to extract the correct data from our post query and create a new object to send to our database.
if (req.method === 'POST') {
    const { body } = req;
    const {
      name,
      images: { 0: { url } = {} },
      uri,
    } = JSON.parse(body);
    const playlistItem = {
      title: name,
      image: url,
      uri: uri,
      addedBy: email,
    };
}
Then all we need to do is call our Prisma client and use the create function to insert our item.
const playlist = await prisma.playlist.create({
  data: playlistItem,
});
return res.status(200).json(playlist);
And that's it, if we now perform a POST request to this API endpoint, our playlist will be added.
Creating the frontend action
For the frontend part, let's open up our index.js page.
Inside the map function add a button with a click action like so:
{list.map((item) => (
  <div key={item.id}>
    <h1>{item.name}</h1>
    <img src={item.images[0]?.url} width='100' />
    <br />
    <button onClick={() => saveToDatabase(item)}>
      Save in database
    </button>
  </div>
))}
Now let's go ahead and make this saveToDatabase function.
const saveToDatabase = async (item) => {
    const res = await fetch('api/playlists', {
      method: 'POST',
      body: JSON.stringify(item),
    });
    const data = await res.json();
};
In our case, we are just passing the API request but not doing anything with the return data yet.
This is perfect as once we click the button, it will call this function and post it to our API. Which in return adds a new entry in our database.
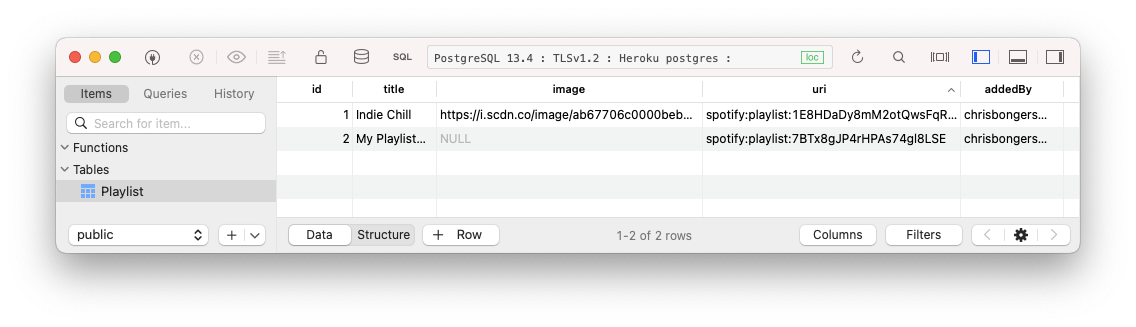
You can also find the complete code on GitHub.
Thank you for reading, and let's connect!
Thank you for reading my blog. Feel free to subscribe to my email newsletter and connect on Facebook or Twitter



