
Medusa-extender custom entity
I'm a full-stack developer from South Africa 🇿🇦. I love writing about JavaScript, HTML and CSS.
Since we moved over to the docker version of medusa, we can quickly run Postgres as our database. With that, we can finally try out some custom entities.
In this specific article, we'll look at how it's done with medusa-extender
Generating the post module
As every new component in medusa-extender is technically a module, let's start by creating a post module with the following command.
./node_modules/.bin/medex g -m post
We'll need an entity next, and we can use the following command for that.
./node_modules/.bin/medex g -e post
Last but not least, we'll need a migration.
./node_modules/.bin/medex g -mi post
Those will be the three commands needed for this article, and they should generate the following structure in your project.

For the module, we don't have to change anything. However, we need to log it in our main.ts file to use it.
import { PostModule } from './modules/post/post.module';

await new Medusa(resolve(__dirname, '..'), expressInstance).load([PostModule]);
As for the entity, open up the file and place the following code inside.
import { Column, Entity } from 'typeorm';
import { Entity as MedusaEntity } from 'medusa-extender';

@MedusaEntity()
@Entity()
export class Post {
  @Column()
  name: string;
}
By default, medusa-extender will take care of the primary entity properties, such as the ID and the date objects. We add a name column to this.
Now we can move to the migration file, which will be used to update our database. We have to write this ourselves at the time of writing due to some technical constraints.
import {MigrationInterface, QueryRunner} from 'typeorm';
import {Migration} from 'medusa-extender';

@Migration()
export class PostMigration1663651032643 implements MigrationInterface {
    name = 'PostMigration1663651032643';

    public async up(queryRunner: QueryRunner): Promise<void> {
        await queryRunner.query(
            `CREATE TABLE IF NOT EXISTS "post" (
                "id" character varying NOT NULL,
                "name" character varying NOT NULL,
                "created_at" TIMESTAMP WITH TIME ZONE NOT NULL DEFAULT now(),
                "updated_at" TIMESTAMP WITH TIME ZONE NOT NULL DEFAULT now()
            )`
        )
    }

    public async down(queryRunner: QueryRunner): Promise<void> {
        await queryRunner.dropTable("post", true)
    }
}
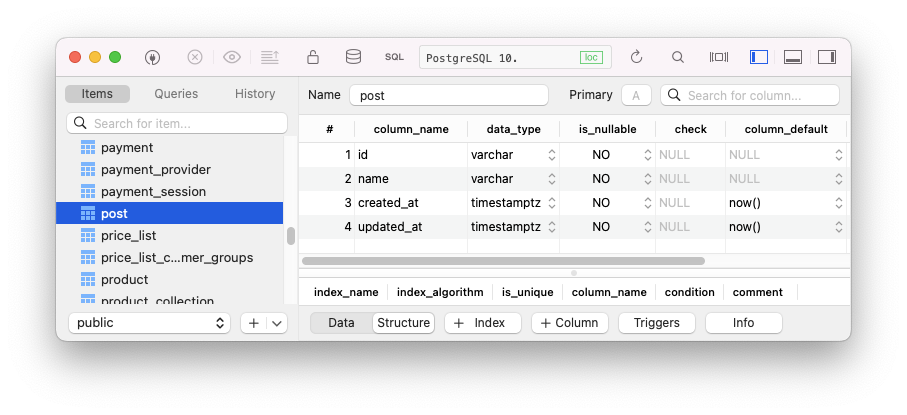
Here we create the table post in the up command with all the columns it should come with.
And in the down command, we delete it, this part is needed for when your query fails, or the user would revert the migration.
The last part is to enable the migrations for the extender. Open up your medusa-config.js file and add the following line:
module.exports = {
  projectConfig: {
    cli_migration_dirs: ['dist/**/*.migration.js'],
  },
};
Now you can open up the docker server instance and run the following commands.
// First, build everything:
npm run build

// Then run the migrations
./node_modules/.bin/medex m -r
And that's it! You should see the post table if you open up your database.
Thank you for reading, and let's connect!
Thank you for reading my blog. Feel free to subscribe to my email newsletter and connect on Facebook or Twitter


