
Javascript native face detector API

I'm a full-stack developer from South Africa 🇿🇦. I love writing about JavaScript, HTML and CSS.
As we now looked at the barcode detector API, I want to introduce you to the face detection API.
Unlike the barcode one, this is not yet publicly available, but we can enable it in Chrome by enabling a flag.
Open Chrome, and type the following address: chrome://flags, in there enable the #enable-experimental-web-platform-features.

Now we should be able to use this face detection as well.
The end result for today will be to detect faces in a picture, as you can see in the image below.
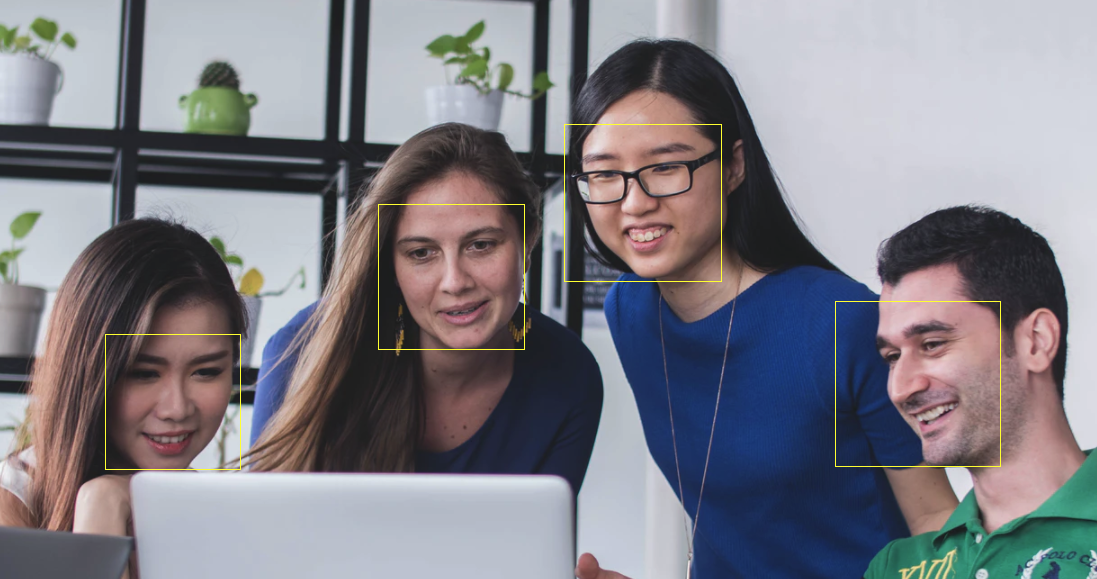
Using the Face Detector API
In general use, the face detector is pretty easy.
We can simply create a new detector like this:
const faceDetector = new FaceDetector();

// Pass options:
const faceDetector = new FaceDetector({
  maxDetectedFaces: 5,
  fastMode: false
});
As you can see we can pass an optional argument, where we can limit the number of faces being found. And we can turn the fast mode on or off. FastMode on means it will focus on speed over accuracy.
The next part is to simply call the detect function and pass an image or video source to it.
try {
  const faces = await faceDetector.detect(image);
  faces.forEach(face => doSomething(face));
} catch (e) {
  console.error('Face detection failed:', e);
}
Making a face detection demo
Let's create our demo, we will use a fixed image for out the demo, so let's set up an image with some people in it.
<img
  src="https://images.unsplash.com/photo-1531545514256-b1400bc00f31?ixid=MnwxMjA3fDB8MHxwaG90by1wYWdlfHx8fGVufDB8fHx8&ixlib=rb-1.2.1&auto=format&fit=crop&w=1567&q=80"
  crossorigin
  alt="Group of people"
/>
Then we can make a window onload function to wait till everything is loaded.
window.onload = () => {
  detect();
};
Here we simply call the detect function, we will be making this function asynchronous.
async function detect() {
  const image = document.querySelector('img');
  const faceDetector = new FaceDetector({fastMode: true});

  try {
    const faces = await faceDetector.detect(image);
    faces.forEach(face => {
      console.log(face);
    });
  } catch (e) {
    console.error('Face detection failed:', e);
  }
}
The function takes the image we set at hand, and it will call the face detector in fast mode.
Then we can detect faces on that image and we simply loop through each image.
A response of an image looks like this:
- boundingBox: The size and position of the box the face fits
- landmarks: Elements like the eye and mouth of a person
So in our example, we get four faces, which is correct. Let's add some boxes over the faces so it's visible what we are looking at!
First, let's wrap our image in a relative holder.
<div id="holder">
  <img
    src="https://images.unsplash.com/photo-1531545514256-b1400bc00f31?ixid=MnwxMjA3fDB8MHxwaG90by1wYWdlfHx8fGVufDB8fHx8&ixlib=rb-1.2.1&auto=format&fit=crop&w=1567&q=80"
    crossorigin
    alt="Group of people"
  />
</div>
Now we can make the holder a relative element, and the image absolutely positioned.
img {
  position: absolute;
}
#holder {
  position: relative;
}
And in our detection, we can now grab each face, and get the width, height, top, and left values.
const faces = await faceDetector.detect(image);
faces.forEach(face => {
  const {top, left, width, height} = face.boundingBox;
  const faceDiv = document.createElement('div');
  faceDiv.className = 'face';
  Object.assign(faceDiv.style, {
    width: `${width}px`,
    height: `${height}px`,
    left: `${left}px`,
    top: `${top}px`
  });
  holder.appendChild(faceDiv);
});
We then create a new div element, with the className face and set the styles for this div, we then add it to our holder div.
Let's quickly add some basic styles for our face div.
.face {
  position: absolute;
  border: 2px solid yellow;
}
If you enabled the flag you should be able to try out the following Codepen.
And that's it we have now done some basic face detection using a native API! I'll leave it up to you to get the eyes and mouth pinned!
Browser support
This API is unfortunately not publicly available, so browser support can't be provided at this stage. However, is a very cool one to look out for!
Thank you for reading, and let's connect!
Thank you for reading my blog. Feel free to subscribe to my email newsletter and connect on Facebook or Twitter



