
Ionic Master Detail view

I'm a full-stack developer from South Africa 🇿🇦. I love writing about JavaScript, HTML and CSS.
Yesterday we added API results to our Ionic app, let's see how we can introduce a detail view to this.
Meaning someone should be able to click on a specific card which should open up a detail screen with more information.
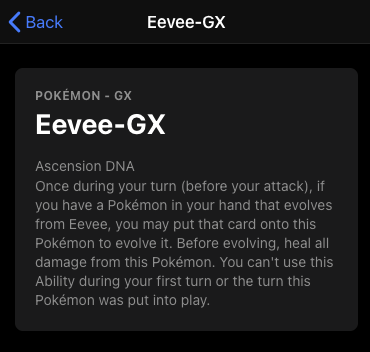
The end result will look like this:

Adding the detail page
Let's start by generating this detail page.
ng g page detail
Now let's make sure it's accessible as a sub route under our tab2.page.
Let's open up tab2-routing.module.ts and add the newly created route under a :id parameter.
const routes: Routes = [
  {
    path: '',
    component: Tab2Page,
  },
  {
    path: ':id',
    loadChildren: () => import('../detail/detail.module').then(m => m.DetailPageModule)
  }
];
This will make sure we can access the route under the following url: tabs/tab2/:id.
While we are at tab2 let's also add the link to the route.
Open up tab2.page.html and add a routerLink to the image.
<img [routerLink]="card.id" [src]="card.imageUrl" [title]="card.name">
This will now navigate to the detail page, but there isn't much to see yet.
Retrieving the data on the detail page
It's possible to send the data along, but imagine someone closing the app on the detail page, the in store cache might get lost and we have now ID of knowing what card they are looking at.
Because of this we will perform an API request based on the ID, it is however a good practice to cache this locally using localStorage for instance.
Open up the detail.page.ts file.
export class DetailPage {
  card: Card;
  constructor(private cardService: CardService, private route: ActivatedRoute) { }

  ionViewWillEnter() {
    let id:string = this.route.snapshot.paramMap.get('id');
    this.cardService.get(id).then((card: Card) => this.card = card);
  }
}
We add a local card reference, which will be available for the HTML, then we inject our cardService and the Router.
We use the view will enter to load the data in the right time. Then we first retrieve the ID of the card from the URL, and pass that to the cardService get function. This will return a card which we update our local reference with.
You might be thinking, but we don't have this get method yet and you are right! So let's open up the card.service.ts and add this method:
get(id: string): Promise<Card> {
    return PokemonTCG.Card.find(id);
}
Allright, now all we need to do is render the HTML for the detail page.
<ion-header>
  <ion-toolbar>
    <ion-title>{{card?.name}}</ion-title>
    <ion-buttons slot="start">
      <ion-back-button defaultHref="/"></ion-back-button>
    </ion-buttons>
  </ion-toolbar>
</ion-header>

<ion-content>
  <ion-card>
    <ion-card-header>
      <ion-card-subtitle>{{ card?.supertype }} - {{ card?.subtype }}</ion-card-subtitle>
      <ion-card-title>{{ card?.name }}</ion-card-title>
    </ion-card-header>

    <ion-card-content>
      <h4>{{ card?.ability?.name }}</h4>
      <p>{{ card?.ability?.text }}</p>
    </ion-card-content>
  </ion-card>
</ion-content>
As you can see we use elements like card?.property the question mark will make sure the element is available.
Else we might get errors saying something like: Trying to get property of undefined.
With this in place you have the detail page setup.
You can find today's code on the following GitHub Repo.
Thank you for reading, and let's connect!
Thank you for reading my blog. Feel free to subscribe to my email newsletter and connect on Facebook or Twitter



