
Command Palette

Search for a command to run...

Creating an SSH connection to a server

Published
3 min read
Creating an SSH connection to a server
C

I'm a full-stack developer from South Africa 🇿🇦. I love writing about JavaScript, HTML and CSS.

SSH is an amazing way to make secure connections to servers. It stands for Secure Shell, and it's a network protocol between two computers.

In our case my laptop, and the server.

Often servers will come with a terminal you will be able to access from their platform. However, this becomes a shell inside a shell.

It's slow, you can't use copy-paste and it hangs suddenly.

Or perhaps you are in need of a connection to configure some auto deployments from GitHub!

All good reasons to have an SSH connection to your server.

In today's article, I'll show you how to set up an SSH connection to a server.

Your basic command will look like this:

ssh [email protected]
// or
ssh [email protected]

And we could use it with a password we set on the server, however in this case we don't want that. We want an instant connection.

Generating the SSH key

Before we can do anything we need an SSH key. It might be that your computer already has one in place for GitHub or whatever reason.

I prefer to make separate ones that I can remove one-by-one.

So let's open up the terminal and run the following command to create a new key.

ssh-keygen -t ed25519 -C "[email protected]"

Change the email to whatever note you want.

This will prompt the following options.

File (Generally something like: /Users/chrisbongers/.ssh/id_ed25519 however you might want to make the name more unique to identify the use case.

In my case, I'll be using server_1.

Then it will ask for a passphrase, and we just type enter, do not use a passphrase here.

In the reporting passphrase also leave it empty.

SSH KeyGen output

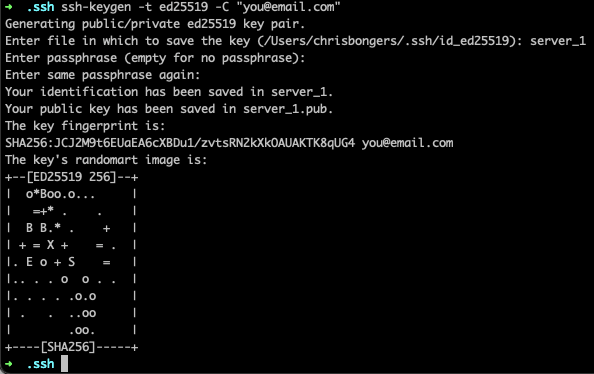
Right, we should now have the public and private keys.

Setting the Authorized keys

The next step is to set this key as an enabled host on the server. At this point you can use the server terminal interface.

Your server should have a ~/.ssh/ directory, if not you can make it.

Inside we should have or add the file: authorized_keys.

nano ~/.ssh/authorized_keys

Inside on a new rule place your key which you can get with the following command on your local computer.

pbcopy < ~/.ssh/server_1.pub

Where server_1 is the name you gave your key.

It will copy a string like this to your keyboard.

ssh-ed25519 AAAAC3NzaC1lZDI1NTE5AAAAIH4TBYa16+8t9LJmqCuMjq+4PSxca81L8sN8OSgT5YW9 [email protected]

Save the file and we should now be able to connect with this key!

Connecting to the server with the SSH key

Now since we named our key differently we should either do a manual statement of the key or add it in our SSH config.

We can add our new key with the following command.

ssh-add -K ~/.ssh/server_1

And now we should be able to test out our SSH key.

ssh [email protected]

Change the user and IP according to your server.

And running the above command should bring us into the server! The first time we'll be prompted with an authentication prompt. We have to say yes to allow the connection once.

After doing that, we can just connect without problems.

Thank you for reading, and let's connect!

Thank you for reading my blog. Feel free to subscribe to my email newsletter and connect on Facebook or Twitter

A

Tu di je ovaj drugi firewall-cmd je greska, ide: firewall-cmd —direct —permanent —passthrough ipv4 -I FORWARD -i nat1 -j ACCEPT

A
  1. sudo su
  1. nmtui

set system hostname: Prezime-00

edit a connection: connection 1: WAN

edit a connection: connection 2: LAN: IPv4 CONFIGURATION MANUAL: ADRESSES ADD 172.17.143.1/24

  1. ifconfig

yum install dhcp

file>otvori jos jedan terminal

  1. [DRUGI TERMINAL]

nano /usr/share/doc/dhcp-4.2.5/dhcpd.conf.example

A slightly different configuration for an internal subnet>COPY

  1. [PRVI TERMINAL]

nano /etc/dhcp/dhcpd.conf>PASTE

subnet 172.17.143.0;

range 172.17.143.2 172.17.143.254;

option routers 172.17.143.1;

option broadcast adress 172.17.143.255;

option domain-name-servers 172.17.143.1;

  1. systemctl enable dhcpd

systemctl start dhcpd

  1. [VPCS]

show ip

ip dhcp

ping 172.17.143.1

ping 1.1.1.1

  1. [TRECI TERMINAL]

sysctl -w net.ipv4.ip_forward=1

sysctl net.ipv4.ip_forward=1

COPY net.ipv4.ip_forward=1

nano /etc/sysctl.d/ipv4_forward.conf PASTE

firewall-cmd --direct --permanent --passthrough ipv4 -t nat -I POSTROUTING -o eth0 -j MASQUERADE

firewall-cmd --direct --permanent --passthrough ipv4 -t nat -I FORWARD -i eth1 -j ACCEPT

firewall-cmd --reload

  1. [VPCS]

ping 1.1.1.1

ping google.hr

  1. [TRECI TERMINAL]

yum install bind bind-utils

nano /etc/named.conf

listen on port 53: 172.17.143.1;

allow-query: 172.17.143.0/24;

forwarders {1.1.1.1; 1.0.0.1; 8.8.8.8; 8.8.4.4; }

  1. firewall-cmd --add-port=53/tcp

firewall-cmd --add-port=53/udp

systemctl start named

systemctl enable named

firewall-cmd --reload

A

Nat eth0 -> switch eth0

MikroTik eth1 -> switch eth1

Webterm eth0 -> switch eth2

Na webtermu odkomentiramo zadnja 2 reda u EDIT CONFIGU

Otvorimo MIKROTIK

ip dhcp-client print (dobivenu adresu ako hoćemo zalijepimo u naziv mikrotika) kod njega je IP 192.168.122.139

Terminal WEBTERMA

ifconfig

ssh [email protected] koji smo dobili

/system identity set name=Prezime-00

user add name=Ime group=full password=12345678

:quit

ssh [email protected]

user print, remove admin, :quit

ssh-keygen -b 4096

ls -al, ls -al .ssh, nano .ssh/id_rsa (samo izađeš iz toga), nano .ssh/id_rsa.pub (isto samo izađeš)

scp .ssh/id_rsa.pub [email protected]:/Prezime.pub

ssh [email protected]

file print

user ssh-keys print

user ssh-keys print public-key-file=Prezime.pub user=Ime, user ssh-keys print, :quit

ssh [email protected]

:quit

ssh [email protected] -o PubkeyAuthentication=no

Dodajemo CentOS i spajamo CentOS eth0 -> switch eth3

ULazimo u CentOS i odlazimo na CTRL+ALT+F2

ifconfig (dobijemo IP adresu i zalijepimo ju u naziv CentOS-a) kod njega je IP 192.168.122.131

Vraćamo se u terminal webterma(Vule provjeri jel ovo točno da je terminal webterma jer mi se kasnije čini da je CENTOS, pa ovo sve tad izbriši i napiši samo CENTOS, hvala)

ls -al .ssh, ssh [email protected], ifconfig, exit, clear

ssh-copy-id [email protected]

ssh-copy-id [email protected] (ne znam iz kojeg se razloga ovo opet moralo napravit)

ssh-copy-id [email protected], exit

ssh [email protected] -o PubkeyAuthentication=no, postavimo neku lozinku (nudit će nam samo), clear

exit, ssh [email protected], sudo su, nano /etcc/ssh/sshd_config

Unutra izbrišemo # (ovaj znak) ispred PubkeyAuthentication=YES, PasswordAuthentication no (promjenimo iz yes u no), izbrišemo # ispred PermitEmptyPasswords no, IZLAZIMO VAN

systemctl restart sshd, exit, clear

Dodajemo windows10 i spajamo Win eth0 - > switch eth4

Ulazimo u windows Passw0rd!

Start, windows powershell (admin)

ipconfig (zalijepimo ju u naziv windowsa) kod njega je IP 192.168.122.226

srat, computer management, services and applications, services, OpenSSH SSH Server, properties, startup type: automatic, APPLY, START s lijeve strane

WEBTERM

ssh [email protected]

ipconfig, exit, clear, gasimo powershell

Otvaramo File manager, gore u sredini pišemo programdata, ssh

U startu otvaramo NotePad, iz programdata desni klik na sshd_config Copy as-path, u NotePadu Open, u File name zalijepimo što smo kopirali, OPEN

Vraćamo se u webterm, id_rsa.pub, refresh u programdata, u webterm ssh [email protected]

ProgramData, administrators_authorized_keys, kopiramo iz NOtePada administrators_authorized_keys, properties, security, advanced, change perrmissions, Authenticated Users stisnemo i Disable inheritance, nakon toga prvo ponuđeno

Opet stisnemo na tog korisnika i REMOVE, gore plavo CHANGE, napišemo na kraj SYSTEM, nakon toga OK, OK, OK

WEBTERM

ssh [email protected], EXIT, ssh [email protected] -o PubkeyAuthentication=no, exit

Idemo u NotePad, izbrišemo # sa PubkeyAuthentication=yes, nađemo PasswordAuthentication yes (promijenimo u no) i maknemo #, ispod njega PermitEmptyPasswords no maknemo #, SAVE desno gore

U computer managementu, services, stisnemo plavi RESTART

WEBTERM

ssh [email protected], dir, exit

More from this blog

D

Daily Dev Tips

887 posts

Looking to get into development? As a full-stack developer I guide you on this journey and give you bite sized tips every single day 👊