
Angular dynamically change form validators

I'm a full-stack developer from South Africa 🇿🇦. I love writing about JavaScript, HTML and CSS.
A while ago, we looked at creating our first form in Angular. It already had some basic validators, but sometimes you need to make a field required or not, based on another field.
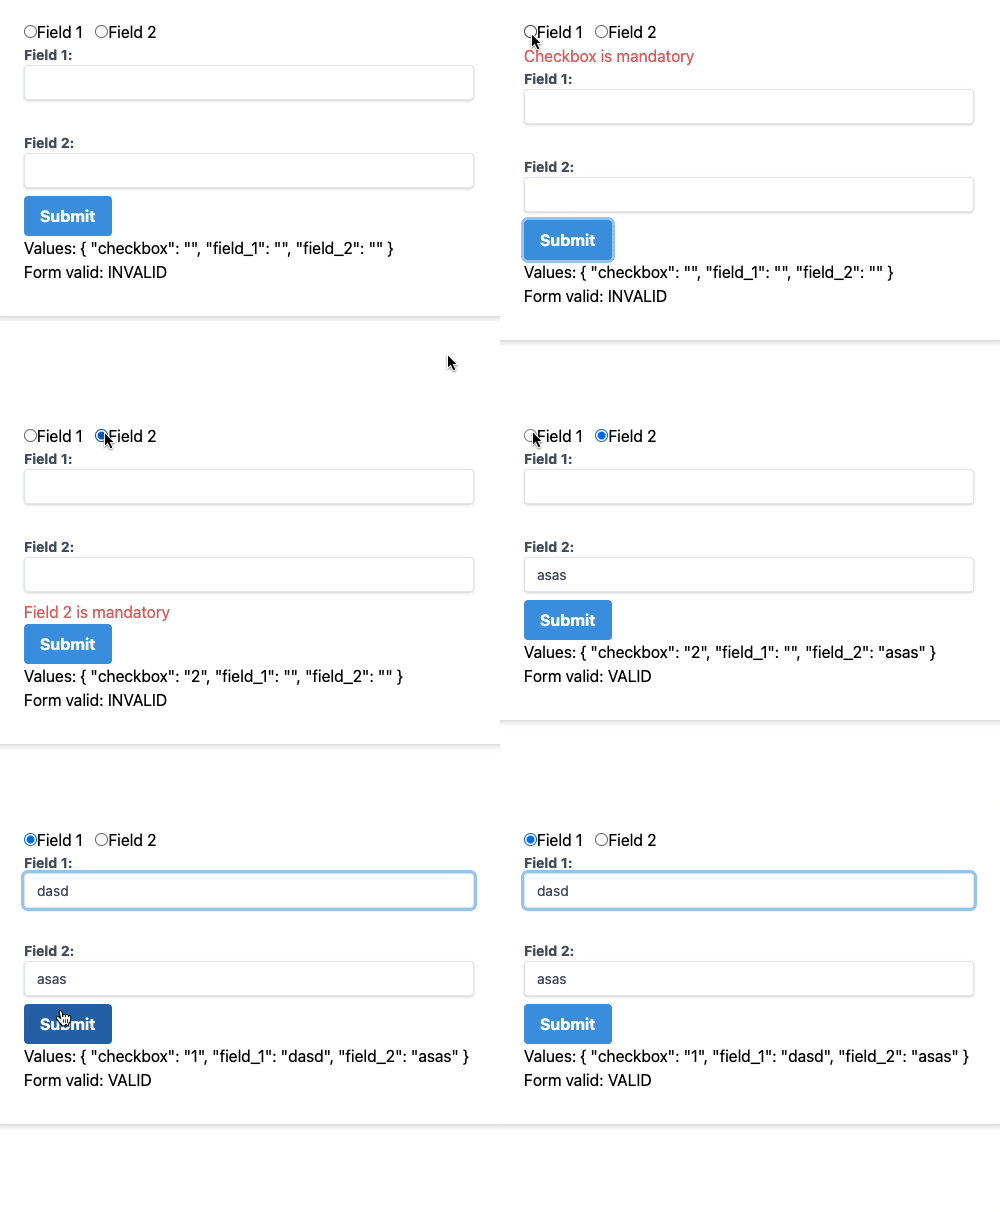
In our example, we want to change the validation of two fields based on a checkbox value.
It will look something like this.
Defining our Angular form
Let's start by creating our basic form. For this example, I'm going to use the following GitHub branch as a starter template.
Let's change our form group to look like this, make these changes in the welcome.component.ts file.
ourForm = new FormGroup({
  checkbox: new FormControl('', Validators.required),
  field_1: new FormControl(''),
  field_2: new FormControl('')
});
As you can see, we define a form with a required checkbox field and two fields with no specific validation.
Now let's add these to our front-end in welcome.component.html.
<form
  [formGroup]="ourForm"
  (ngSubmit)="onSubmit()"
  class="px-8 pt-6 pb-8 mb-4 bg-white rounded shadow-md"
>
  <label>
    <input type="radio" value="1" formControlName="checkbox" (change)="radioChange()" />
    <span>Field 1</span>
  </label>
  <label>
    <input type="radio" value="2" formControlName="checkbox" (change)="radioChange()" />
    <span>Field 2</span>
  </label>
  <div
    class="text-red-500"
    *ngIf="submitted && ourForm.controls.checkbox.errors?.required"
  >
    Checkbox is mandatory
  </div>

  <label class="block mb-2 text-sm font-bold text-gray-700">
    Field 1:
    <input
      type="text"
      formControlName="field_1"
      class="w-full px-3 py-2 leading-tight text-gray-700 border rounded shadow appearance-none focus:outline-none focus:shadow-outline"
    />
  </label>
  <div
    class="text-red-500"
    *ngIf="submitted && ourForm.controls.field_1.errors?.required"
  >
    Field 1 is mandatory
  </div>

  <label class="block mb-2 text-sm font-bold text-gray-700">
    Field 2:
    <input
      type="text"
      formControlName="field_2"
      class="w-full px-3 py-2 leading-tight text-gray-700 border rounded shadow appearance-none focus:outline-none focus:shadow-outline"
    />
  </label>
  <div
    class="text-red-500"
    *ngIf="submitted && ourForm.controls.field_2.errors?.required"
  >
    Field 2 is mandatory
  </div>

  <button
    type="submit"
    class="px-4 py-2 font-bold text-white bg-blue-500 rounded hover:bg-blue-700 focus:outline-none focus:shadow-outline"
  >
    Submit
  </button>
</form>
A couple of things to note from the markup above, we use the formGroup as we have seen before in the previous article.
Next, we added a change function to our checkbox since we need to change validation.
Then I've added some error div's to show which fields are required.
Now let's go back to the ts file and add some of these changes.
submitted: boolean = false;

radioChange() {
    if (this.ourForm.controls.checkbox.value == 2) {
        this.ourForm.controls.field_1.setValidators([Validators.nullValidator]);
        this.ourForm.controls.field_2.setValidators([Validators.required]);
    } else {
        this.ourForm.controls.field_1.setValidators([Validators.required]);
        this.ourForm.controls.field_2.setValidators([Validators.nullValidator]);
    }
    this.ourForm.controls.field_1.updateValueAndValidity();
    this.ourForm.controls.field_2.updateValueAndValidity();
}

onSubmit() {
    this.submitted = true;
}
This is where the magic happens. We, first of all, add the submitted boolean. Next up is the actual change function. Here we check the current value of the checkbox. If it's 2 we make field_2 required, and field_1 not, visa versa.
And that's it. This will give us the option to dynamically change validators for certain fields.
You can also download the full code from GitHub.
Thank you for reading, and let's connect!
Thank you for reading my blog. Feel free to subscribe to my email newsletter and connect on Facebook or Twitter



