# Browser extensions - Popup extension
We have already had quite the exposure to browser extensions so far and looked at the following items:
- [A first extension](https://daily-dev-tips.com/posts/browser-extensions-our-first-extension/)
- [New tab extension](https://daily-dev-tips.com/posts/browser-extensions-new-tab-extension/)
- [Adding Tailwind to browser extensions](https://daily-dev-tips.com/posts/browser-extensions-adding-tailwind-css/)
- [Adding React to browser extensions](https://daily-dev-tips.com/posts/browser-extensions-spicing-it-up-with-react/)
This article will look at how we can set up a popup extension. This extension pops up when you click on the icon in your toolbar.
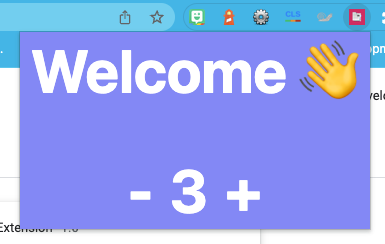
The result for today will be this popup extension showing our React app in the dropdown.
## Setting up the popup extension
First, create the new project and navigate to it.
```bash
mkdir popup-extension && cd popup-extension
```
Then let's initialize a new node project.
```bash
npm init -y
```
Now we can start adding the packages we need.
```bash
npm i react react-dom tailwindcss vite
```
- [React and React-dom](https://daily-dev-tips.com/posts/browser-extensions-spicing-it-up-with-react/) to enable React for this project
- [Tailwindcss](https://daily-dev-tips.com/posts/browser-extensions-adding-tailwind-css/) to handle the styling for us
- And [Vite](https://daily-dev-tips.com/posts/browser-extensions-switching-parcel-to-vite/) as our build tool.
And the dev dependencies we'll use.
```bash
npm i -D @vitejs/plugin-react postcss-cli
```
Let's start by initializing the Taiwlidn config.
```bash
npx tailwind init
```
This will create a `tailwind.config.js` file, where you can place the following config.
```js
/** @type {import('tailwindcss').Config} */
module.exports = {
content: ['src/*.jsx'],
theme: {
extend: {},
},
variants: {
extend: {},
},
plugins: [],
};
```
Let's also add a `.postcssrc.json` file to our project's root.
```json
{
"plugins": {
"tailwindcss": {}
}
}
```
The Tailwind config's last step is to add a `css` folder with a `style.css` file inside.
```css
@tailwind base;
@tailwind components;
@tailwind utilities;
```
Then we also want a Vite config file called `vite.config.js`.
```js
import { defineConfig } from 'vite';
import react from '@vitejs/plugin-react';
export default defineConfig({
plugins: [react()],
});
```
Also, open up your `package.json` and add the following scripts.
```js
"scripts": {
"dev": "vite",
"build": "vite build",
"preview": "vite preview"
},
```
## Creating the public assets and manifest
Extensions work based on the manifest file to run it in our build. We can create a `public` folder.
Create another folder called `icons` and put your extension icons there. (or use mine from the GitHub project).
Also, put a file called `manifest.json` inside.
```json
{
"manifest_version": 3,
"version": "1.0",
"name": "Popup Extension",
"description": "A demo popup experience",
"action": {
"default_icon": "icons/icon-48.png",
"default_popup": "index.html"
},
"icons": {
"48": "icons/icon-48.png"
}
}
```
Now, if we create this `index.html` file at the root of our project, we should be ready to try it out.
```html
DDT Popup
Hello world 👋
```
If you now build and install the plugin, following [these directions](https://daily-dev-tips.com/posts/browser-extensions-new-tab-extension/#testing-the-extension), you should be able to add it to your browser.

As you can see in the screenshot above, it looks relatively small and unstyled.
It also has no interactivity. Let's change that by adding some Tailwind and React.
## Adding Tailwind and React, a popup extension
We already loaded all the needed configurations, so let's start by converting our plain HTML into a React app.
In your `index.html`, replace the body with the following contents.
```html
```
Now we'll have to create an `src` directory, which will be the main entry point for our React application.
Inside this directory, start by adding an `index.jsx` file.
```js
import ReactDOM from 'react-dom';
import { App } from './App';
const app = document.getElementById('app');
ReactDOM.render(, app);
```
This is our basic React init and injects React into our app.
Let's create this App component by adding an `App.jsx` file.
```js
import Counter from './Counter';
export function App() {
return (
Welcome 👋
);
}
```
As you can see, this also renders a Counter component responsible for some interactions.
Let's create that one as well: `Counter.jsx`.
```js
import { useState } from 'react';
export default function Counter() {
const [counter, setCounter] = useState(0);
const increase = () => setCounter((count) => count + 1);
const decrease = () => setCounter((count) => count - 1);
return (
{counter}
);
}
```
As you can see, throughout these components, we also introduced some Tailwind classes that should take care of the styling.
Let's build our app again and try it out in the browser.

It looks to be there, but our app is super narrow, and we can't see much!
Let's fix that by making our main popup a fixed size.
Open up the `style.css` file and add the following line.
```css
#app {
width: 350px;
}
```
Now build the app again and try it out.

You can find the complete code on [GitHub](https://github.com/rebelchris/popup-extension).
### Thank you for reading, and let's connect!
Thank you for reading my blog. Feel free to subscribe to my email newsletter and connect on [Facebook](https://www.facebook.com/DailyDevTipsBlog) or [Twitter](https://twitter.com/DailyDevTips1)