# Browser extensions - Custom options page
In the previous article, we added an [option to change the color of our extensions](https://daily-dev-tips.com/posts/browser-extensions-using-storage/).
So far, we have used our main popup view, but we can also leverage the browser options menu.
This is a neat trick to clean up extension options, and in this article, I'll show you how you can achieve it.
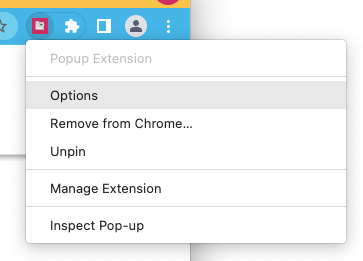
If you would like to follow along with the article, take the following [GitHub branch](https://github.com/rebelchris/popup-extension/tree/storage) as your starting point.
## Adding options to a browser extension
Like everything involving the extensions, we must first register the options menu in our manifest file.
Open the `manifest.json` file and add the following config.
```js
{
"options_ui": {
"page": "options.html",
"open_in_tab": false
}
}
```
This will register the options screen we call `options.html`, and we tell it not to open a new tab. (this will open it in a popup).
This options file will become a new app and run separately from our existing one.
Create your project's `options.html` file and add the following code.
```html
DDT Pop-up
```
Let's go ahead and create this options folder in our src directory, and inside create the `index.jsx` file.
```js
import ReactDOM from 'react-dom';
import { App } from './App';
const app = document.getElementById('options');
ReactDOM.render(, app);
```
As you can see, this is just another React bootstrap file. Let's go ahead and create the options `App.jsx` file.
```js
import { useState } from 'react';
export function App() {
const [color, setColor] = useState('indigo');
chrome.storage.sync.get('color', (storedColor) => {
setColor(storedColor.color);
});
const pickColor = (pickedValue) => {
setColor(pickedValue);
chrome.storage.sync.set({ color: pickedValue });
window.close();
};
return (
);
}
```
This code came from the main `App.jsx` file, so go ahead and remove the select option from that.
We need to register this new entry point in our Vite config, so Vite knows it should create two files.
Open your `vite.config.js` file and place the following config in it.
```js
import { defineConfig } from 'vite';
const { resolve } = require('path');
import react from '@vitejs/plugin-react';
export default defineConfig({
plugins: [react()],
build: {
rollupOptions: {
input: {
main: resolve(__dirname, 'index.html'),
options: resolve(__dirname, 'options.html'),
},
},
},
});
```
Now Vite knows it's a multi-app project.
The last thing we want to do is modify our `tailwind.config.js` file as we now use subfolders.
```js
/** @type {import('tailwindcss').Config} */
module.exports = {
// Old
content: ['src/*.jsx'],
// New
content: ['src/**/*.jsx'],
};
```
And that's it. You can now go ahead and build your application.
The user will now be able to modify the color through the options menu.

You can find the complete code in this [GitHub branch](https://github.com/rebelchris/popup-extension/tree/options).
### Thank you for reading, and let's connect!
Thank you for reading my blog. Feel free to subscribe to my email newsletter and connect on [Facebook](https://www.facebook.com/DailyDevTipsBlog) or [Twitter](https://twitter.com/DailyDevTips1)